
Many people enjoy the high quality of life in Pacific Northwest due to its natural beauty, mild climate and friendly locals. But that high quality of life also comes with a price.
The U.S.G.S. ranks Washington as the fifth most earthquake prone state behind Alaska, California, Hawaii and Nevada. Though most of the Washington’s earthquakes are too small to feel, the Emergency Management Division estimates more than 1,000 earthquakes occur in the state each year.
While most earthquakes go unnoticed, the seismic zone where you live can affect the intensity and frequency with which you feel earthquakes. Unfortunately, one of the most vulnerable regions in Washington also seems to be the most heavily populated. The Puget Sound area from Seattle to Tacoma lies directly over known fault lines of the Cascadia subduction zone.
Though only a dozen or so earthquakes are strong enough to actually be felt, the resulting damage can be catastrophic. The good news is there are steps you can take to protect yourself, your home and your valuables.
The following suggestions are more commonly found in new construction but can be retrofitted to already built homes as well. They are known as the ABCs of retrofitting; Anchoring, Bracing and Connecting.
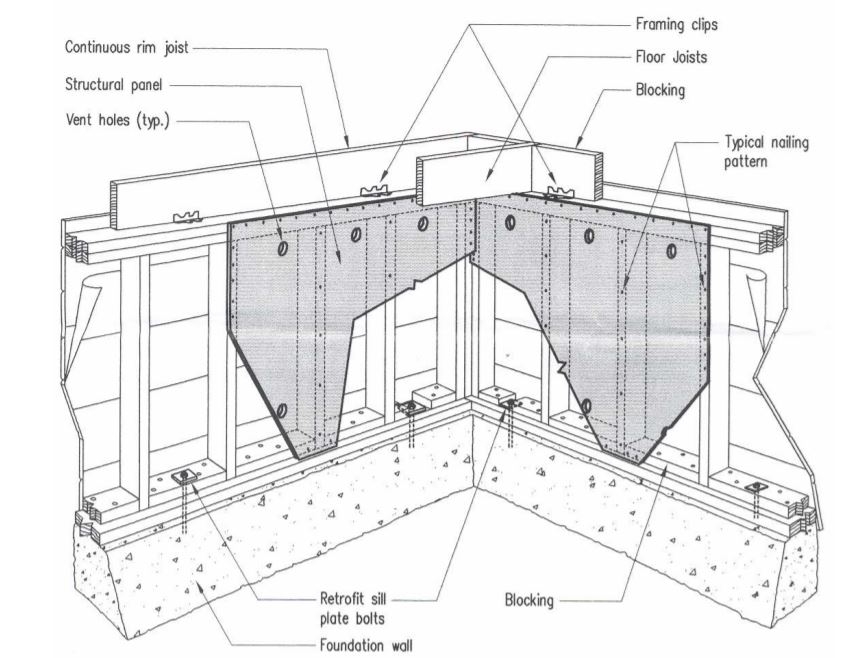
ANCHORING – Anchoring is the process of bolting the framing of the house to the foundation it rests on. In most cases, the horizontal board that rests on the foundation is called a sill plate (or mudsill). If the sill plate is not securely anchored, an earthquake can cause it to shift from its resting place on the foundation creating a potential for severe damage or injury.
To secure the sill plate, holes are drilled through the sill plate and into the foundation with a rotary hammer or right angle drill. Anchor bolts are then driven into the holes using a sledge hammer. The anchor bolt should protrude above the sill plate with enough length to accommodate a nut and a washer. As the nut is tightened, the expanding metal sleeve at the base on the anchor bolt slides up and wedges the bolt in the concrete foundation thus securing the sill plate to the foundation.
Sizing for anchor bolts varies from one half by seven inches to three quarters by ten inches. The larger sizes provide more protection against lateral loads and are preferred for multi-story homes. Bolt spacing is at least one bolt every six feet, and one bolt within twelve inches on the end of any sill plate.
BRACING – Bracing is the process of stiffening the cripple (or pony walls). Cripple walls are very common in the northwest and typically enclose a crawl space. They are best described as the short walls located between the top of the foundation and the bottom of the first floor.
If the vertical studs of a cripple wall are not braced, tremors can shake them to the point where they topple over like dominoes causing the house above to collapse down onto the foundation or into the crawl space below.
To prevent cripple walls from failing a two-step process is employed. The first step involves adding blocking to the existing wood frame of the cripple wall. The dimensional lumber used for blocking should be of the same dimensions as the lumber used to make the cripple wall. It is cut to size and added between the existing vertical studs at the top and bottom of the cripple wall. Additional vertical studs can be added as needed.
The second step in cripple wall bracing locks the framing in place by nailing plywood to the interior face of the cripple wall. The plywood (or Orientated Strand Board) should be at least one-half-inch plywood or five-eighths-inch if you use a nail gun.
It is recommended to install at least 8 linear feet from each interior corner for one story houses and sixteen linear feet for two story houses. Be advised, some sources recommend sheathing the whole cripple wall if possible while others say not only is this not necessary, but over-bracing can cause the cripple wall to lose it ductility, an important consideration in any seismic area. Be sure to check with your local building codes to find an appropriate solution.
To ensure longevity of the plywood consider treating it with a preservative before installing. Additionally, ventilation holes can be drilled into the plywood sheathing allowing the interior components to dry out should they get wet.
CONNECTING – Connecting is the process of ensuring that certain portions of the first floor structure are secured to the underlying support structure; this could be a slab foundation, a foundation wall or a wood framed cripple wall.
There are many ways this can be accomplished depending on the how the house was built and its foundation type but nearly all of them utilize external hardware in the form of clips, anchors or braces.
In houses without cripple walls, rim joists (joists that run perpendicular to the floor joists) can be connected to the sill plates with clips. Another method uses anchors to connect the floor joists directly to the foundation. The same result can be achieved using angle iron with pre drilled holes instead of clips.
Houses with crawl spaces and cripple walls would use clips and angle iron to secure the rim joists to the top plate of the cripple wall.